
 Electron 安装和打包不同平台的 FFmpeg
最近在写一个[自动匹配弹幕的动漫播放器](https://github.com/marchen-dev/MarchenPlay),里面需要使用 FFmpeg 对视频进行解析,但发现如何根据不同的平台打包不同 FFmpeg 到 Electron 里,是个挺麻烦的问题,这篇文章就来讲述下我的解决思路。 ## 安装 用户的电脑很有可能没有安装 FFmpeg,所以我们需要把 FFmpeg 打包进我们的应用里面。 想要在 Electron 开发环境里面导入 FFmpeg 还是比较简单的,只需要安装下面的包,然后就能够在 Electron 中使用了。 ```bash pnpm add -D @ffmpeg-installer/ffmpeg @ffprobe-installer/ffprobe fluent-ffmpeg ``` 创建 `ffmpeg.ts`,具体使用方式可以阅读 [fluent-ffmpeg](https://www.npmjs.com/package/fluent-ffmpeg)。 ```typescript import ffmpegPath from '@ffmpeg-installer/ffmpeg' // 安装 ffmpeg 的二进制文件 import ffprobePath from '@ffprobe-installer/ffprobe' // 安装 ffprobe 的二进制文件 import ffmpeg from 'fluent-ffmpeg' // 一个封装了 ffmpeg API 的库,当然可以选择不安装,直接使用字符串拼接的方式调用 ffmpeg.setFfmpegPath(ffmpegPath.path) ffmpeg.setFfprobePath(ffprobePath.path) export default class FFmpeg { ffmpeg: ffmpeg.FfmpegCommand constructor(inputPath: string) { this.ffmpeg = ffmpeg(inputPath) } } ``` 之后我们在开发环境里面就能正常使用 FFmpeg 了。 ## 打包 ### 路径问题 我的项目是使用 electron builder 进行打包的(具体的 `electron-builder.yml`配置可以在 [Electron 代码签名和公证](https://www.suemor.com/posts/programming/electron-code-signing-and-notarization) 中查看),打包之后你会发现项目是无法正确使用 FFmpeg,但在 dev 环境下到是正常的。 这是因为 ffmpeg 是二进制文件,会被打包进 `app.asar.unpacked` 而非 `app.asar` 从而导致 setFfmpegPath 路径出现问题,所以修改对应的 path 即可,这个问题在 [@ffmpeg-installer/ffmpeg](https://www.npmjs.com/package/@ffmpeg-installer/ffmpeg#wrong-path-under-electron-with-asar-enabled) 中也有提到。 ```typescript import ffmpegPath from '@ffmpeg-installer/ffmpeg' import ffprobePath from '@ffprobe-installer/ffprobe' import ffmpeg from 'fluent-ffmpeg' ffmpeg.setFfmpegPath(ffmpegPath.path.replace('app.asar', 'app.asar.unpacked')) // 修改 ffmpeg.setFfprobePath(ffprobePath.path.replace('app.asar', 'app.asar.unpacked')) // 修改 export default class FFmpeg { ffmpeg: ffmpeg.FfmpegCommand constructor(inputPath: string) { this.ffmpeg = ffmpeg(inputPath) } } ``` > 我使用的电脑是 MacBook Pro M1 Pro 即 macOS ARM64 打包完成之后,此时运行 ARM64 版本的 .app 是没有问题的,FFmpeg 也能正确运行。 ### FFmpeg 的架构版本问题 #### 启动报错 但可不要高兴的太早,我们换一台运行 macOS x64 的电脑,运行刚才用 macOS ARM64 电脑打包出来的 x64 版本的 .app 就会直接报错,然后显示一个完全摸不到头脑的错误。  #### 原因分析 我一开始看到这个错误也是完全懵逼的,使用 [debugtron](https://github.com/pd4d10/debugtron) 对主线程进行调试也完全没有输出。之后尝试对包进行分析,发现 x64 版本的 .app 打包的 FFmpeg 竟然是 ARM64 版本的,这不报错才怪呢。  这里我便对 `@ffmpeg-installer/ffmpeg`的实现感到了好奇,他是如何匹配不同的平台,从而安装对应其平台的 FFmpeg 二进制文件。通过阅读其源码: ```json { "name": "@ffmpeg-installer/ffmpeg", "optionalDependencies": { "@ffmpeg-installer/darwin-arm64": "4.1.5", "@ffmpeg-installer/darwin-x64": "4.1.0", "@ffmpeg-installer/linux-arm": "4.1.3", "@ffmpeg-installer/linux-arm64": "4.1.4", "@ffmpeg-installer/linux-ia32": "4.1.0", "@ffmpeg-installer/linux-x64": "4.1.0", "@ffmpeg-installer/win32-ia32": "4.1.0", "@ffmpeg-installer/win32-x64": "4.1.0" } } ``` ```json { "name": "@ffmpeg-installer/darwin-x64", "os": [ "darwin" ], "cpu": [ "x64" ], } ``` 发现`@ffmpeg-installer/ffmpeg` 封装了多个平台 FFmpeg 依赖,然后放入 `optionalDependencies` 中。每个平台的 FFmpeg 包再通过设置 `cpu + os` 字段,从而实现用户安装 `@ffmpeg-installer/ffmpeg` 即可匹配用户系统,来安装对应的 ffmpeg,这也让我涨知识了。 因此也难怪 x64 版本的 .app 打包的 FFmpeg 是 ARM64 版本的,因为我们在最开始 pnpm install 的时候,就只安装了对应操作系统的 FFmpeg,build 的时候也只能打包当前安装的 FFmpeg。 举个例子,我是 ARM64 macOS, pnpm install 的时候只会安装 ARM 版本 FFmpeg,打包 x64 的时候,当然也只能打包 ARM 版本 FFmpeg 了,从而导致的错误。  #### 整理思路 那么我们的思路就很明确了: * ARM64 macOS -> 打包 ARM64 应用 -> 使用 ARM64 FFmpeg * ARM64 macOS -> 打包 x64 应用 -> 使用 x64 FFmpeg 同理: * x64 macOS -> 打包 ARM64 应用 -> 使用 ARM64 FFmpeg * x64 macOS -> 打包 x64 应用 -> 使用 x64 FFmpeg 那么如何实现呢? > 这里思路完全是自己想的,或许有更好的方法,也请多多指教。 说一下我的思路,首先我们在 pnpm install 的时候只安装当前操作系统的 FFmpeg 是不变的,这样可以节约我们电脑的空间和安装依赖的速度。 之后只需要在执行 `pnpm build:mac`的时候,执行一个安装 mac 平台全部架构的 FFmpeg 依赖脚本就可以了。 #### 解决问题 编写 `scripts/install-darwin-deps.js` ```javascript /* eslint-disable no-console */ import { exec } from 'node:child_process' import os from 'node:os' const platform = os.platform() if (platform === 'darwin') { console.log('Detected macOS, installing darwin dependencies...') // 为了在 macos arm64 架构下进行打包 x64 架构的 APP, 所以需要同时安装 x64 arm64 架构的 ffmpeg 和 ffprobe exec( 'pnpm i @ffmpeg-installer/darwin-x64@^4.1.0 @ffprobe-installer/darwin-x64@^5.1.0 @ffmpeg-installer/darwin-arm64@^4.1.5 @ffprobe-installer/darwin-arm64@^5.0.1 -D', (err, stdout, stderr) => { if (err) { console.error(`Error installing optional dependencies: ${stderr}`) throw new Error('Error installing optional dependencies') } else { console.log(`Optional dependencies installed: ${stdout}`) } }, ) } else { console.log('Non-macOS platform detected, skipping optional darwin installation.') } ``` 之后在 package.json 里面加上 ` "build:mac": "node scripts/install-darwin-deps.js && electron-vite build && electron-builder --mac --publish never"` 即可。 执行打包命令之后,macOS x64 也是正确运行 macOS ARM64 打包出来的 x64 版本的 xxx.app ,不再会出现之前那个摸不着头脑报错了。 ### 不同平台只打包对应的 FFmpeg 这里新的问题有又出现了,我们发现当前 xxx.dmg 包体积大了很多,那是因为所有平台的 FFmpeg 都被打包进去了。例如,ARM64 版本 xxx.app 把 x64 和 ARM64 FFmpeg 都打包进去了。  这里我们得写一个脚本,在 electron builder 打包之后,把与目标平台不相符的 FFmpeg 给删除掉,编写 `scripts/cleaned-unused-arch-deps.js` ```javascript /* eslint-disable no-console */ import fs from 'node:fs' import path from 'node:path' export default async function cleanDeps(context) { const { packager, arch, appOutDir } = context const platform = packager.platform.nodeName if (platform !== 'darwin') { return } const archMap = { 1: 'x64', 3: 'arm64', } const currentArch = archMap[arch] if (!currentArch) { return } const unpackedPath = path.resolve( appOutDir, 'Marchen.app', 'Contents', 'Resources', 'app.asar.unpacked', 'node_modules', ) if (!fs.existsSync(unpackedPath)) { return } const ffmpegPath = path.resolve(unpackedPath, '@ffmpeg-installer') const ffprobePath = path.resolve(unpackedPath, '@ffprobe-installer') if (!fs.existsSync(ffmpegPath) || !fs.existsSync(ffprobePath)) { return } const removeUnusedArch = (basePath, unusedArch) => { const unusedPath = path.resolve(basePath, `darwin-${unusedArch}`) if (fs.existsSync(unusedPath)) { fs.rmSync(unusedPath, { recursive: true }) } } if (currentArch === 'x64') { removeUnusedArch(ffmpegPath, 'arm64') removeUnusedArch(ffprobePath, 'arm64') } else if (currentArch === 'arm64') { removeUnusedArch(ffmpegPath, 'x64') removeUnusedArch(ffprobePath, 'x64') } console.log('Cleaned unused arch dependencies.') } ``` 之后在 electron-builder.yml 里面使用 `afterPack: scripts/cleaned-unused-arch-deps.js` 导入脚本。 然后执行 `pnpm build:mac`就实现了不同平台只打包对应的 FFmpeg,并且运行都正常了。查看包内容,发现确实只包含了目标平台的 FFmpeg。 
TypeScript前端Electron TypeScript 类型父子级、逆变、协变、双向协变和不变
> 我也是最近刚接触到了这些知识,文章可能有些错误,希望大佬多多指点( 对于学习 TypeScript 了解类型的逆变、协变、双向协变和不变是很重要的,但你只要明白类型的父子级关系,这些概念理解起来就会容易许多,因此在讲述这些之前我们必须先学会类型的父子级关系。 ## 类型的父子级 首先明确一个概念,对于 TypeScript 而言,只要类型结构上是一致的,那么就可以确定父子关系,这点与 Java 是不一样的(Java 必须通过 extends 才算继承)。 我们可以看下面的例子: ```typescript interface Person { name: string; age: number; } interface Suemor { name: string; age: number; hobbies: string[] } ``` 你应该可以发现这两个类型是有继承关系,此时你可以去思考到底谁是父级、谁是子级? 你可能会觉得 Suemor 是 Person 的父类型(毕竟 Person 有 2 个属性,而 Suemor 有 3 个属性且包含 Person),如果是这么理解的话那就错。 在类型系统中,属性更多的类型是子类型,也就是说 Suemor 是 Person 的**子类型**。 因为这是反直觉的,你可能很难理解(我当时也理解不了),你可以尝试这样去理解:**因为 A extends B , 于是 A 就可以去扩展 B 的属性,那么 A 的属性往往会比 B 更多,因此 A 就是子类型**。或者你记住一个特征,**子类型比父类型更加具体**。 另外判断联合类型父子关系的时候, 'a' | 'b' 和 'a' | 'b' | 'c' 哪个更具体? 'a' | 'b' 更具体,所以 'a' | 'b' 是 'a' | 'b' | 'c' 的子类型。 ## 协变 ### 对象中运用 协变理解起来很简单,你可能在平日里开发经常用到,例如: ```typescript interface Person { name: string; age: number; } interface Suemor { name: string; age: number; hobbies: string[] } let person: Person = { // 父级 name: '', age: 20 }; let suemor: Suemor = { // 子级 name: 'suemor', age: 20, hobbies: ['play game', 'codeing'] }; //正确 person = suemor; //报错,如果你的编辑器没有报错,请打开严格模式,至于为什么后面双向协变会讲 suemor = person; ``` 这俩类型不一样,但是 suemor 却可以赋值给 person,也就是子级可以赋值给父级,反之不行(至于为什么,你可以想想假如 person 能够正确赋值给 suemor,那么调用 `suemor.hobbies`你的程序就坏到了)。 因此得出结论: **子类型可以赋值给父类型的情况就叫做协变。** ### 函数中运用 同样的函数中也可以用到协变,例如: ```typescript interface Person { name: string; age: number; } function fn(person: Person) {} // 父级 const suemor = { // 子级 name: "suemor", age: 19, hobbies: ["play game", "codeing"], }; fn(suemor); fn({ name: "suemor", age: 19, // 报错 // 这里补充个知识点(因为当时我学的时候脑抽了),这里的 hobbies 会报错,是因为它是直接赋值,并没有类型推导。 hobbies: ["play game", "codeing"] }) ``` 这里我们多给一个 hobbies,同理因为协变,子类型可以赋值给父类型。 因此我们平日的`redux`,在声明 `dispatch` 类型的时候,可以这样去写: ```typescript interface Action { type: string; } function dispatch<T extends Action>(action: T) { } dispatch({ type: "suemor", text:'测试' }); ``` 这样约束了传入的参数一定是 `Action` 的子类型,也就是说必须有 `type`,其他的属性有没有都可以。 ### 双向协变 我们再看一下上上节的例子: ```typescript interface Person { name: string; age: number; } interface Suemor { name: string; age: number; hobbies: string[] } let person: Person = { // 父级 name: '', age: 20 }; let suemor: Suemor = { // 子级 name: 'suemor', age: 20, hobbies: ['play game', 'codeing'] }; //正确 person = suemor; //报错 -> 设置双向协变可以避免报错 suemor = person; ``` `suemor = person`的报错我们可以在 `tsconfig.json`设置 `strictFunctionTypes:false`或者关闭严格模式,此时我们父类型可以赋值给子类型,子类型可以赋值给父类型,这种情况我们便称为**双向协变**。 因此双向协变就是: **父类型可以赋值给子类型,子类型可以赋值给父类型**。 但是这明显是有问题的,不能保证类型安全,因此我们一般都会打开严格模式,避免出现双向协变。 ## 不变 不变是最简单的。如果没有继承关系(A 和 B 没有一方包含对方全部属性)那它就是不变,因此非父子类型之间只要类型不一样就会报错: ```typescript interface Person { name: string; age: number; } interface Suemor { name: string; sex:boolean } let person: Person = { name: "", age: 20, }; let suemor: Suemor = { name: 'suemor', sex:true }; // 报错 person = suemor; ``` ## 逆变 逆变相对难理解一点,看下方例子: ```typescript let fn1: (a: string, b: number) => void = (a, b) => { console.log(a); }; let fn2: (a: string, b: number, c: boolean) => void = (a, b, c) => { console.log(c); }; fn1 = fn2; // 报错 fn2 = fn1; // 这样可以 ``` 你会发现:fn1 的参数是 fn2 的参数的父类型,那为啥能赋值给子类型? 这就是逆变,父类型可以赋值给子类型,函数的参数有逆变的性质(而返回值是协变的,也就是子类型可以赋值给父类型)。 至于为什么,如果`fn1 = fn2`是正确的话,我们只能传入`fn1('suemor',123)`,但 `fn1`调却要输出 `c`,那就坏掉了。 因此我感觉逆变一般会出现在: 父函数参数与子函数参数之间赋值的时候(注意是函数与函数之间,而不是调用函数的时候,我是这么理解的,不知道对不对)。 因为逆变相对在类型做运算时用的会多一点,因此我们再看一个稍微难一点例子: ```typescript // 提取返回值类型 type GetReturnType<Func extends Function> = Func extends ( ...args: unknown[] ) => infer ReturnType ? ReturnType : never; type ReturnTypeResullt = GetReturnType<(name: string) => "suemor">; ``` 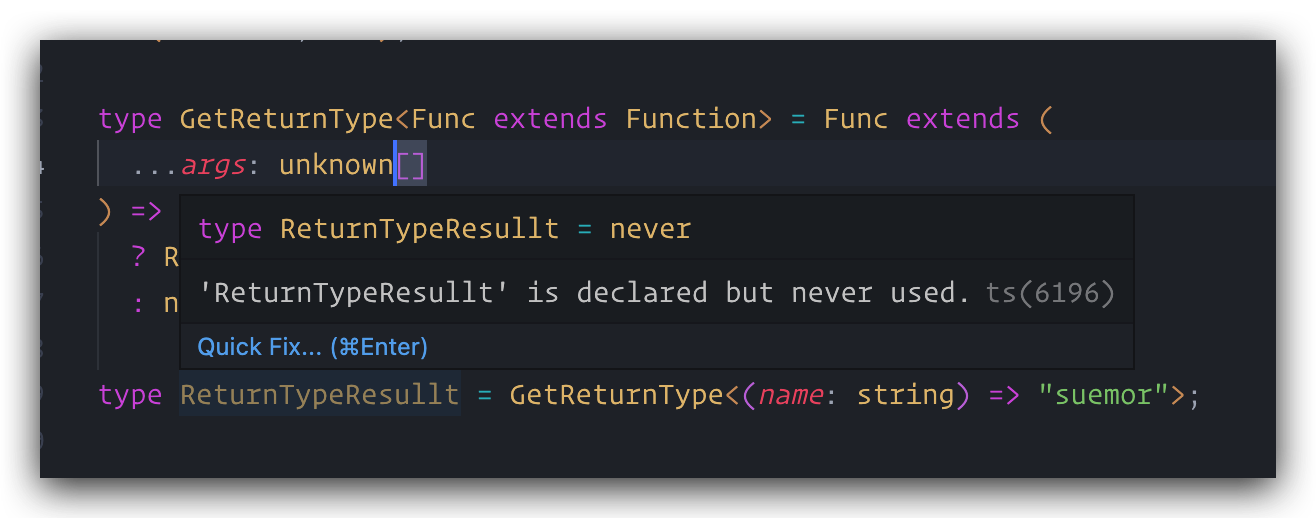 这里`GetReturnType`使用来提取返回值类型,这里`ReturnTypeResullt`原本应当是`suemor`,但如上代码却得出结果为`never`。 因为函数参数遵循逆变,也就是只能父类型赋值给子类型,但很明显这里的 `unknown` 是 `{name: string}` 的父类型,所以反了,应该把`unknown`改为`string`的子类型才行,所以应该把 unknown 改为`any或者never`,如下为正确答案: ```typescript type GetReturnType<Func extends Function> = Func extends ( ...args: any[] ) => infer ReturnType ? ReturnType : never; type ReturnTypeResullt = GetReturnType<(name: string) => "suemor">; ``` 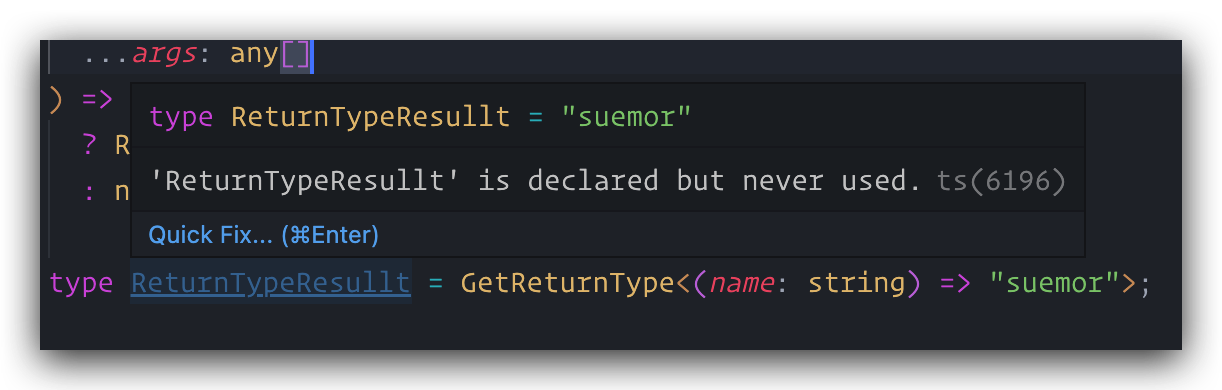
前端TypeScript HTTP 的数据传输方式和编码格式
我们向后端发起 http 请求时,会要求指定数据传输的方式,通常情况下包含如下 5 种 * query * url param * form-urlencoded * form-data * json 下面我会讲述之间的区别,并同时列举 axios 和 fetch 的写法。 ## url param 这个是最简单的,一般用在 GET 请求中,就是直接在 url 后面加上参数,例如: ```bash http://localhost:3000/post/7231564187255881765 ``` 这种一般用于请求某篇文章之类的。 ### axios ```javascript axios.get("http://localhost:3000/post/7231564187255881765") ``` ### fetch ```javascript fetch("http://localhost:3000/post/7231564187255881765") ``` ## query 这种也一般用在 GET 请求中,就是利用 `&`来分割数据,例如: ```bash http://localhost:3000/posts?page=1&size=10 ``` 一般 GET 请求需要传递多个参数都会用这种,比如上方例子中的分页请求。 这种请求如果涉及到中文或特殊字符需要进行编码才行,一般可以用 JavaScript `encodeURLComponent`API 进行处理, 或者 `query-string`或 `qs` 这两个 npm 库。 不过现在浏览器都比较智能了,已经会自动帮你进行特殊编码了,所以就算你不进行处理也没关系。 ### axios axios 已经帮你做好编码处理了,你可以直接写。 ```javascript axios.get("http://localhost:3000/user", { params: { name: "史蒂夫", }, }); ``` ### fetch fetch 已经帮你做好编码处理了,但为了兼容性和可靠性,也可以显式地使用 `encodeURIComponent` 对 URL 的各个部分进行编码。 ```javascript fetch(`http://localhost:3000/person/?name=${encodeURIComponent("史蒂夫")}`); // 或者 fetch(`http://localhost:3000/person/?name=史蒂夫`); ``` ## form-urlencoded 这种也一般用在 POST 请求中,form 直接提交数据就是这种,它其实和 query 差不多,都是利用 `&`来拼接数据,也都要进行编码,只不过 `form-urlencoded` 把这个字符串放在 body 里了,然后指定 Content-Type 是 `application/x-www-form-urlencoded`,不过这种方式用的相对较少,大多数后端都会要求传 JSON。 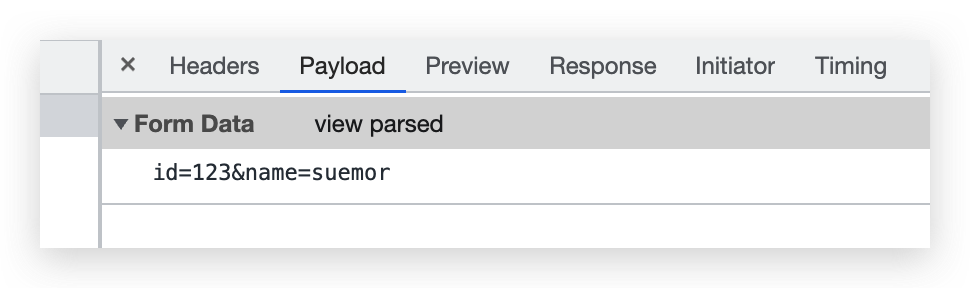 ### axios axios 会自动帮你把 Content-Type 指定为 `application/x-www-form-urlencoded`,所以直接在 body 里放入数据即可 ```javascript axios.post(`http://localhost:3000/user`, "id=123&name=suemor"); ``` 但这么写不太优雅,一般会配合 qs 这个库来使用 ```bash pnpm i qs ``` ```javascript import qs from "qs"; axios.post( `http://localhost:3000/user`, qs.stringify({ id: 123, name: "suemor" }) ); ``` ### fetch 注意 fetch 并没有帮你指定 Content-Type,需要手动指定为 `application/x-www-form-urlencoded` ```javascript import qs from "qs"; fetch(`http://localhost:3000/user`, { method: "POST", body: "id=123&name=suemor", headers: { "Content-Type": "application/x-www-form-urlencoded", }, }); // 或者 fetch(`http://localhost:3000/user`, { method: "POST", body: qs.stringify({ id: 123, name: "suemor" }), headers: { "Content-Type": "application/x-www-form-urlencoded", }, }); ``` ## json 这种也一般用在 POST 请求中,是我们 POST 请求最常见的一种传输方式,直接传递 JSON,且无需编码,需要指定 Content-Type 为 `application/json`。 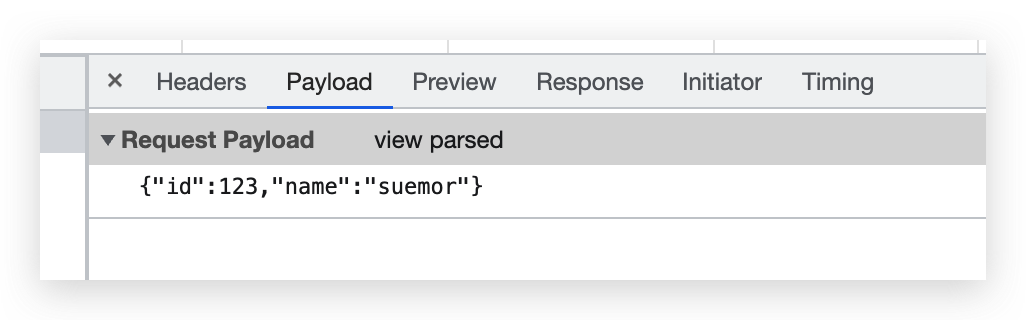 ### axios axios 会自动帮你把 Content-Type 指定为 `application/json`,且自动包了一层 `JSON.stringify`,你只要在第二参数中传入 JavaScript 对象即可。 ```javascript axios.post(`http://localhost:3000/user`, { id: 123, name: "suemor" }); // 等价于 axios.post(`http://localhost:3000/user`, `{"id":123,"name":"suemor"}`, { headers: { "Content-Type": "application/json", }, }); ``` ### fetch fetch 就没 axios 那么智能了,需要手动指定`Content-Type` 和 `JSON.stringify` ```javascript fetch(`http://localhost:3000/user`, { method: "POST", body: JSON.stringify({ id: 123, name: "suemor" }), headers: { "Content-Type": "application/json", }, }); ``` ## form-data 这种也用在 POST 请求中,一般用于文件上传,`--------- + 随机数`做为分隔符,无需编码,需要指定 Content-Type 为 `multipart/form-data`。 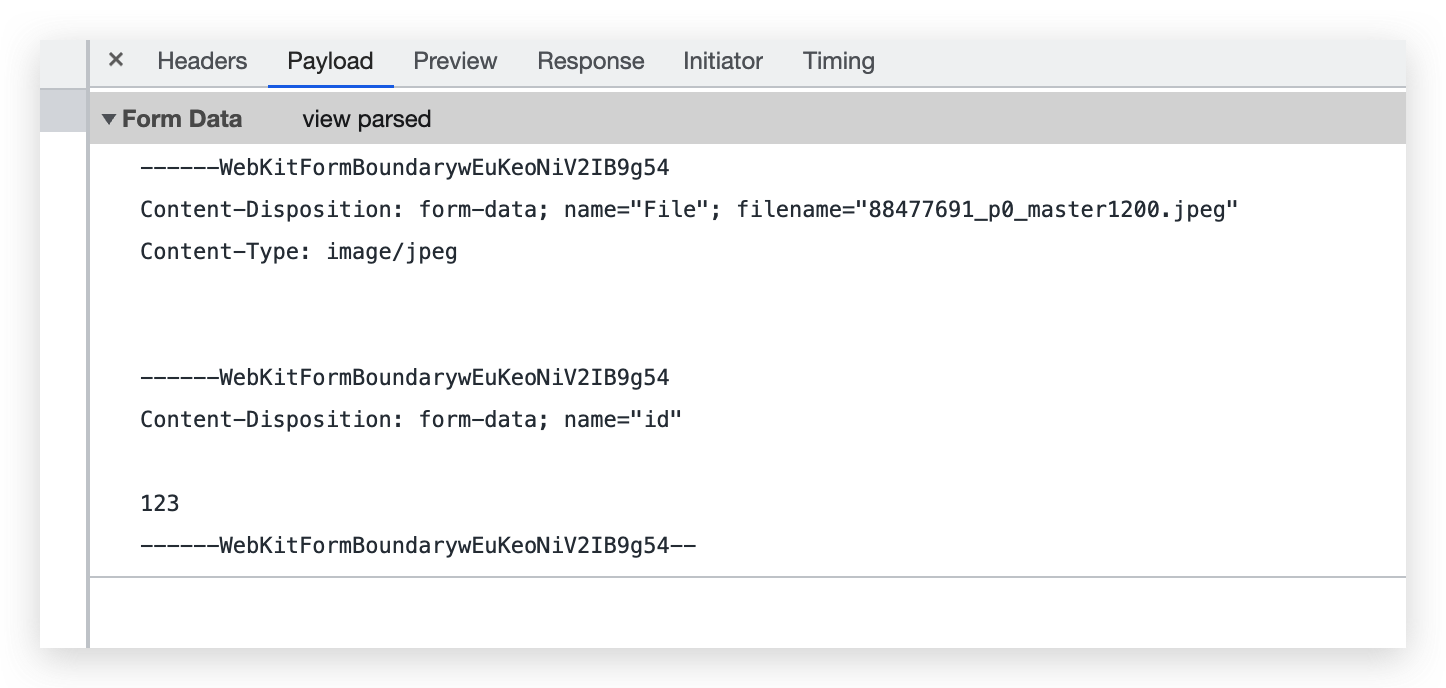 ### axios axios 会自动添加 Content-Type 为 `multipart/form-data` ```typescript function App() { const upLoadHandler = (event: ChangeEvent<HTMLInputElement>) => { const formData = new FormData(); const fileList = event.target.files; if (!fileList) return; formData.set("File", fileList[0]); formData.set("id", "123"); axios.post(`http://localhost:3000/file`, formData); }; return <input type="file" name="file" onChange={upLoadHandler} />; } ``` ### fetch fetch 会自动添加 Content-Type 为 `multipart/form-data`,写法与 axios 类似 ```typescript function App() { const upLoadHandler = (event: ChangeEvent<HTMLInputElement>) => { const formData = new FormData(); const fileList = event.target.files; if (!fileList) return; formData.set("File", fileList[0]); formData.set("id", "123"); fetch(`http://localhost:3000/file`, { method: "POST", body: formData, }); }; return <input type="file" name="file" onChange={upLoadHandler} />; } ```
前端 Vue3使用TSX
最近尝试在Vue3中使用TSX开发一些小玩具。不出所料,还是遇到许多问题的,尝试写一篇博客来记录一下。 ## TSX支持 Vue3项目中集成tsx还是很简单的,只需要安装官方维护的vite插件`pnpm install @vitejs/plugin-vue-jsx -D`,然后在vite配置文件中use一下即可。 ```javascript import { defineConfig } from 'vite' import vue from '@vitejs/plugin-vue' import vueJsx from "@vitejs/plugin-vue-jsx"; export default defineConfig({ plugins: [ vue(), vueJsx() ] }) ``` 然后把目录中以`.vue`结尾的文件全部换成`.tsx`,接着以如下格式书写即可 ```javascript import {defineComponent} from 'vue' export default defineComponent({ setup(props, ctx) { return () => ( <> <div>Hello World</div> </> ); } }) ``` 其实这个插件的核心还是`@vue/babel-plugin-jsx`,只是封装了一层供vite插件调用,因此tsx的一些基础语法可以直接参看[@vue/babel-plugin-jsx](https://github.com/vuejs/babel-plugin-jsx)来学习,本文就不再叙述了。 ## Props与TSX 既然我们使用的是tsx,那么vue3.2中的`script setup`语法糖就无法使用了,因此我们使用vue3.0的方式定义props即可。 ```javascript import {defineComponent, PropType, Ref, ref} from 'vue' export default defineComponent({ setup(props, ctx) { const isShow = ref<boolean>(true) return () => ( <> <Children isShow={isShow}/> <button onClick={()=>isShow.value = !isShow.value}>显示/隐藏</button> </> ); } }) const Children = defineComponent({ props:{ isShow:{ type:Object as PropType<Ref<boolean>>, required: true, } }, setup(props, ctx) { const {isShow} = props const inputValue = ref<string>('') return () => ( <> <div v-show={isShow.value}> <input type="text" v-model={inputValue.value}/> <p>{inputValue.value}</p> </div> </> ); } }) ``` <img src="https://suemor.oss-cn-beijing.aliyuncs.com/img/image-20220424220420718.png" alt="image-20220424220420718" style="zoom:50%;" /> 阅读以上代码可以发现在tsx中用`ref`定义的变量,并不会如用`template`一样自动解构,还需要手动调用.value。另外`v-if、v-for`在tsx中是用不了的,但`v-show v-model`还是可以使用的。 ## Emit与TSX 我们平日里使用的`Vue template`中会用 `@` 去监听一个事件,但在tsx中我们会用`on`前缀来替代。 ```javascript import {defineComponent, PropType, Ref, ref} from 'vue' export default defineComponent({ setup(props, ctx) { const handleHello = (str:string)=>{ console.log(str) } return () => ( <> <Children onHello={handleHello}/> </> ); } }) const Children = defineComponent({ emits:['hello'], setup(props, {emit}) { return () => ( <> <button onClick={()=>emit('hello','你好世界')}>emit</button> </> ); } }) ``` 这里有个小坑,就是子组件使用emit时,一定要先使用`emits:['hello']`来声明这个自定义事件,否则父组件会报ts错误。当然你也可以不声明,把父组件改成`<Children {...{onHello:handleHello}}/>`就可以了。 ## Slot与TSX ### 默认插槽 Vue 的 slots 在tsx中也有些改变,我们先来看看默认插槽 ```javascript import {defineComponent, PropType, Ref, ref} from 'vue' export default defineComponent({ setup(props, ctx) { return () => ( <> <Children> <p>这是默认插槽</p> </Children> </> ); } }) const Children = defineComponent({ setup(props, {slots}) { return () => ( <> {slots.default?.()} </> ); } }) ``` 发现我们得调用`slots.default?.()`来获取插槽内容 ### 具名插槽 ```javascript import {defineComponent, PropType, Ref, ref} from 'vue' export default defineComponent({ setup(props, ctx) { return () => ( <> <Children v-slots={{ header: () => ( <>这是header插槽</> ) }}> </Children> </> ); } }) const Children = defineComponent({ setup(props, {slots}) { return () => ( <> {slots.header?.()} </> ); } }) ``` 可以看到,父组件通过 v-slots 属性去定义插槽。当然默认插槽也可以放在v-slots里面定义。`default: () => (<>这是默认插槽</>),` ### 作用域插槽 ```javascript import {defineComponent} from 'vue' export default defineComponent({ setup(props, ctx) { return () => ( <> <Children v-slots={{ content:(scope:{name:string})=> <>{scope.name}</> }}> </Children> </> ); } }) const Children = defineComponent({ setup(props, {slots}) { return () => ( <> {slots.content?.({name:'suemor'})} </> ); } }) ``` 如示例所示,传参即可。 ## 结尾 总而言之Vue3搭配tsx坑还挺多的,比如与一些组件库搭配起来可能会出现各种奇怪的问题,这个以后再说吧,今天就先到这里了。
前端Vue3tsx- React + Vite 搭建一个简单的组件库
> 随着技术栈的迭代,本篇文章已经严重过时,仅供简单的参考,如果跟着敲,会出现很多报错。 ## 前言 最近阅读了下 vite 的文档,发现它有个`库模式`用来打包挺方便的,因而写篇博客记录下折腾过程。 ## 基本配置 执行如下命令创建一个 React + TypeScript 的项目 ```bash pnpm create vite ``` 删除 src 和 public 文件夹,创建 example 和 packages 文件夹,其中 example 存放组件示例或者调试组件,packages 存放组件源码。另外别忘了修改根目录 index.html `script`路径。 ```javascript ├── node_modules ├── packages ├── example ├── index.html ├── package.json ├── pnpm-lock.yaml ├── tsconfig.json ├── tsconfig.node.json └── vite.config.ts // index.html <script type="module" src="/example/main.tsx"></script> ``` > 注:相关 eslint prettier tsconfig 的配置请自行查看末尾 git 仓库,这不是本文的重点。 下面我们打开 `vite.config.ts`,对打包进行配置(记得先安装下 @types/node ) ```javascript import { readFileSync } from 'fs' import path from 'path' import { defineConfig } from 'vite' import react from '@vitejs/plugin-react' const packageJson = JSON.parse( readFileSync('./package.json', { encoding: 'utf-8' }), ) const globals = { ...(packageJson?.dependencies || {}), } function resolve(str: string) { return path.resolve(__dirname, str) } export default defineConfig({ plugins: [react()], build: { // 输出文件夹 outDir: 'dist', lib: { // 组件库源码的入口文件 entry: resolve('packages/index.tsx'), // 组件库名称 name: 'demo-design', // 文件名称, 打包结果举例: suemor.cjs fileName: 'suemor', // 打包格式 formats: ['es', 'cjs'], }, rollupOptions: { //排除不相关的依赖 external: ['react', 'react-dom', ...Object.keys(globals)], }, }, }) ``` 此时你在 `packages/index.tsx` 文件夹中任意 export 些代码,他应该可以被正确打包成 CommonJS 与 ESM 了。 ## 组件编写 为了简单起见,我们组件就编写一个有类型支持且可以切换颜色的 Tag。 <img src="https://y.suemor.com/imagesimage-20221202141137213.png" alt="image-20221202141137213" style="zoom: 50%;" /> 安装依赖 ```bash pnpm i less clsx -D ``` > 下面这些 react 代码就不介绍了 编写 `packages/Tag/interface.ts` ```typescript import { CSSProperties, HTMLAttributes } from 'react' /** * @title Tag */ export interface TagProps extends Omit<HTMLAttributes<HTMLDivElement>, 'className' | 'ref'> { style?: CSSProperties className?: string | string[] /** * @zh 设置标签背景颜色 * @en The background color of Tag */ color?: Colors } type Colors = 'red' | 'orange' | 'green' | 'blue' ``` 编写`packages/Tag/index.tsx` ```tsx import clsx from 'clsx' import { forwardRef } from 'react' import './style' import { TagProps } from './interface' const Tag: React.ForwardRefRenderFunction<HTMLDivElement, TagProps> = ( props, ref, ) => { const { className, style, children, color, ...rest } = props return ( <div ref={ref} style={style} {...rest} className={clsx(className,'s-tag', `s-tag-${color}`)} > {children} </div> ) } const TagComponent = forwardRef<unknown, TagProps>(Tag) TagComponent.displayName = 'Tag' export default TagComponent export { TagProps } ``` 编写 `packages/Tag/style/index.less` ```less @colors: red, orange, green, blue; .s-tag { display: inline; padding: 2px 10px; each(@colors, { &-@{value} { background-color: @value; color: #fff; } }); } ``` 编写 `packages/Tag/style/index.ts` ```typescript import './index.less'; ``` 编写 `packages/index.tsx` ```tsx export type { TagProps } from './Tag/interface' export { default as Tag } from './Tag' ``` 注意:此时如果我们进行打包会报错,因为我们没有安装 `@rollup/plugin-typescript` 插件,无法打包 ts 类型,生成 d.ts 。 ```bash pnpm i @rollup/plugin-typescript@8.5.0 -D //这里最新版本似乎有些奇怪问题,所以我们先安装下 8.5.0 版本 ``` 去 `vite.config.ts` 引入插件 ```typescript import typescript from '@rollup/plugin-typescript' plugins: [ react(), typescript({ target: 'es5', rootDir: resolve('packages/'), declaration: true, declarationDir: resolve('dist'), exclude: resolve('node_modules/**'), allowSyntheticDefaultImports: true, }), ], ``` 此时我们执行 `pnpm build` ,就完成了打包,生成如下目录 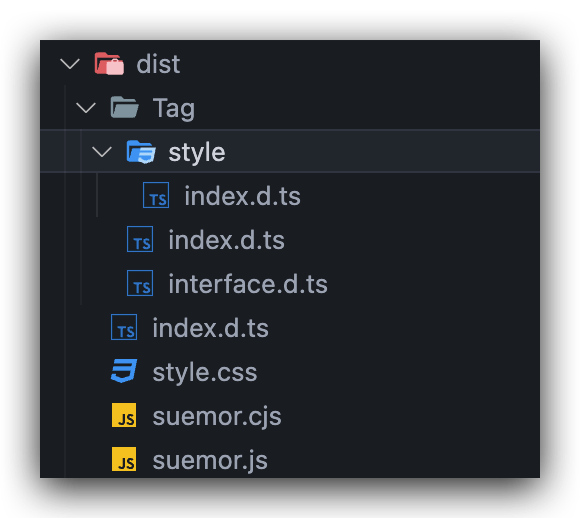 ## 发布 npm 但此时我们把包发布到 npm 上,用户依旧是无法使用的,我们还需在 `package.json`上定义一下基础入口信息和类型声明: ```javascript { "name": "@suemor/demo-design", "version": "0.0.1", "type": "module", "main": "./dist/suemor.cjs", "module": "./dist/suemor.js", "types": "./dist/index.d.ts", "exports": { ".": { "require": "./dist/suemor.cjs", "import": "./dist/suemor.js" }, "./style": "./dist/style.css" }, "publishConfig": { "access": "public" }, //指定你要上传到 npm 上的文件夹 "files": [ "dist" ], ... } ``` 完成之后执行,即可发布到 npm 上。 ```bash npm publish ``` 之后在你的其它项目中引入,即可正常显示,且具备 TypeScript 的类型提示。 ```tsx import { Tag } from "@suemor/demo-design"; import '@suemor/demo-design/style' const App = () => { return ( <div> <Tag color="orange">我是标签</Tag> </div> ); }; export default App; ``` <img src="https://y.suemor.com/imagesimage-20221202151736637.png" alt="image-20221202151736637" style="zoom: 50%;" /> 自此一个简单的组件库主体部分开发完毕(虽然很不完善),下面引入单元测试。 ## 添加单元测试 我们使用 vitest 进行单元测试: ```bash pnpm i vitest jsdom @testing-library/react -D ``` 打开 `vite.config.ts`文件,在文件**第一行**添加类型声明,并在`defineConfig`加几行配置,让 `rollup`处理`.test`文件: ```javascript /// <reference types="vitest" /> test: { globals: true, environment: 'jsdom', coverage: { reporter: [ 'text', 'json', 'html' ] } } ``` 再打开 `package.json` 添加 npm 命令: ```javascript "scripts": { "dev": "vite", "build": "tsc && vite build", "preview": "vite preview", "test": "vitest" } ``` 一般我们会把单测的代码放在 `__test__` 文件夹下,所以新建 `packages/Tag/__test__/index.test.tsx`,代码如下: ```typescript import { describe, expect, it, vi } from 'vitest' import { fireEvent, render, screen } from '@testing-library/react' import { Tag, TagProps } from '../..' const defineColor: Array<Pick<TagProps, 'color'> & { expected: string }> = [ { color: 'red', expected: 's-tag-red' }, { color: 'orange', expected: 's-tag-orange' }, { color: 'green', expected: 's-tag-green' }, { color: 'blue', expected: 's-tag-blue' }, ] const mountTag = (props: TagProps) => { return render(<Tag {...props}>Hello</Tag>) } describe('tag click', () => { const handleCallback = vi.fn() const tag = mountTag({ onClick: handleCallback }) it('tag click event excuted correctly', () => { fireEvent.click(tag.container.firstChild as HTMLDivElement) expect(handleCallback).toHaveBeenCalled() }) }) describe.each(defineColor)('Tag color test', ({ color, expected }) => { it('tag color', () => { const tag = mountTag({ color }) const element = tag.container.firstChild as HTMLDivElement expect(element.classList.contains(expected)).toBeTruthy() }) }) ``` 执行 `pnpm test`即可正常单元测试。 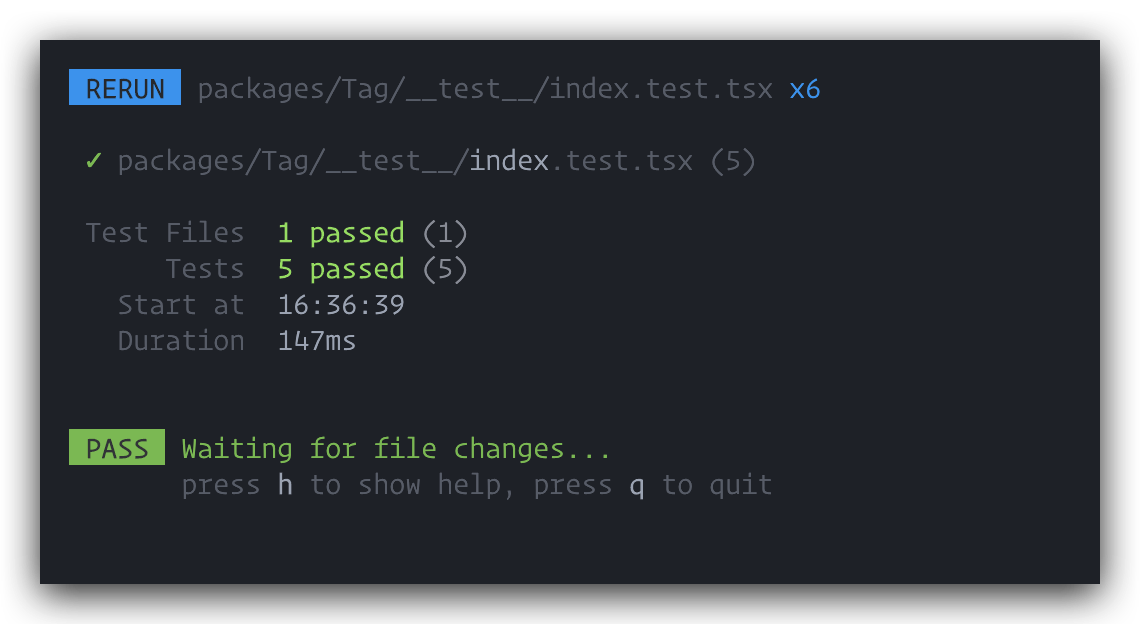 ## 完整代码 完整代码仓库: https://github.com/suemor233/suemor-design-demo
reactviterollup前端组件库 - JavaScript 解析 MP4 二进制:ArrayBuffer、TypedArray 与 DataView
本文介绍 JavaScript 处理二进制数据的三种 API:ArrayBuffer 是底层数据容器,TypedArray 适合同构数组访问,DataView 适合按任意偏移、类型和字节序读写。结合 MP4 Box 结构可知,因其字段类型混杂、偏移不对齐且采用大端序,DataView 最适合解析字段,Uint8Array 最适合切片、拷贝和扫描。
JavaScriptMP4二进制数据